¶ Sharenix Setup Tutorial
¶ Introduction
Sharenix is a Linux-native ShareX alternative that allows image auto-uploading to a service of your choice. This tutorial will show you how to setup Sharenix with Horizon so screenshots are auto-uploaded to Horizon.
¶ Pre-requisites
- Linux machine
- This tutorial will focus on Debian-based distros.
- 2 GB of RAM
- 5 GB of Free Disk Space
- Keyboard
Throughout this tutorial, pseudo-code will be referenced using
<text>.
¶ Step 1: Install Dependencies
Sharenix's source code is hosted on Github and is written in Golang.
¶ Update Apt Repository
Before installing wget to our system, we need to update our apt universe to get the most up to date packages.
sudo apt update
¶ Install wget
Let's install wget to our system.
sudo apt install wget -y
¶ Step 2: Install Sharenix
¶ Download Pre-built Binary
Head to Sharenix Releases and find the latest release. Right click on the latest release's sharenix-x86_64.tar.xz file, copy the URL to your clipboard and open your terminal.
Use
wget <clipboard URL>
¶ Extract
tar xvf sharenix-*.tar.xz
¶ Copy Binary
sudo cp sharenix-*/sharenix /usr/bin
¶ Chmod
sudo chmod +x /usr/bin/sharenix
¶ Copy sharenix-section Binary
sudo cp sharenix-*/src/sharenix-section /usr/bin
¶ Chmod
sudo chmod +x /usr/bin/sharenix-section
¶ Copy sharenix-window Binary
sudo cp sharenix-*/src/sharenix-window /usr/bin
¶ Chmod
sudo chmod +x /usr/bin/sharenix-window
¶ Copy Config
cp sharenix-*/sharenix.json ~/.sharenix.json
¶ Verify Installation
sharenix -h
If successful, you should see something similar to:
Usage of sharenix:
  -c	Copy url to clipboard - copies the uploaded file's url to the clipboard (not guaranteed to work properlyon all window managers, tested on Unity + X11) (default true)
  -g	Show verbose debug information (output can include sensitive info such as API keys)
  -history
    	Show upload history (grep-able)
  -httptest.serve string
    	if non-empty, httptest.NewServer serves on this address and blocks
  -m string
    	Upload mode - f/file: upload file, fs/fullscreen: screenshot entire screen and upload, s/section: select screen region and upload, c/clipboard: upload clipboard contents, r/record: record screen region and upload, u/url: shorten url (default "f")
  -n	Notification - displays a GTK notification for the upload
  -o	Open url - automatically opens the uploaded file's url in the default browser
  -q	Quiet mode - disables all terminal output except errors
  -s string
    	Target site name (default = default site for the selected mode) (default "default")
  -upload
    	If false, the file will be archived but not uploaded (default true)
  -v	Shows the program version
You've successfully installed Sharenix!
¶ Step 3: Get Horizon Sharenix Config
Now that we've installed Sharenix, we need the Horizon config to enable auto-upload.
Head to your Horizon Settings page while logged in and click “Download Configs”.
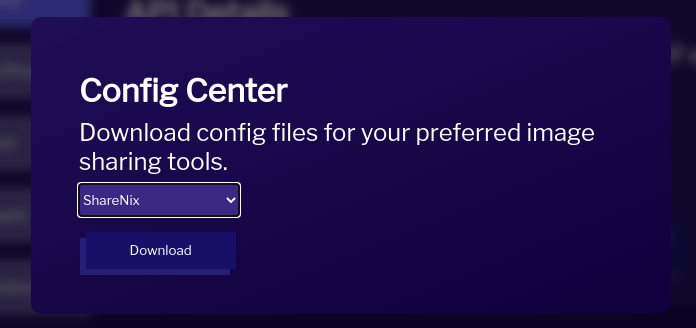
Select ShareNix in the options and click Download.

Download Configs Popup
Your browser will prompt you to save a .json file. Save this.
¶ Step 4: Use Sharenix Config
Let's add our Horizon config to Sharenix.
Use
cat horizon.json
and copy the output text.
Your output text should look something like:
{
  "Name": "james Horizon.Pics",
  "DestinationType": "ImageUploader, FileUploader",
  "RequestType": "POST",
  "RequestURL": "https://api.has-cool.pics/upload",
  "Headers": {
    "Authorization": "Bearer XXXXXXXX-XXXX-XXXX-XXXX-XXXXXXXXXXXX"
  },
  "Body": "MultipartFormData",
  "FileFormName": "file",
  "URL": "$json:data.fileLink$",
  "DeletionURL": "$json:data.deleteLink$"
}
Edit the Sharenix config file with:
nano ~/.sharenix.json
Paste the copied text from the downloaded .json file into the Services property in the Sharenix config file.
Then, change DefaultFileUploader and DefaultImageUploader to the "name" property of the output text of your .json file from Horizon. In this case, it's james Horizon.Pics.
Save with CTRL + X, Y and enter.
You've successfully configured Sharenix with Horizon!
¶ Step 5: Bind Sharenix To Shortcut (GNOME)
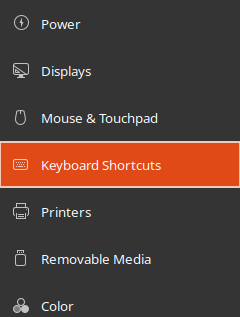
Open GNOME Settings and go to Keyboard Shortcuts.

Keyboard Shortcuts in GNOME Settings
Scroll all the way down and click the + icon.

The add button in Keyboard Shortcuts
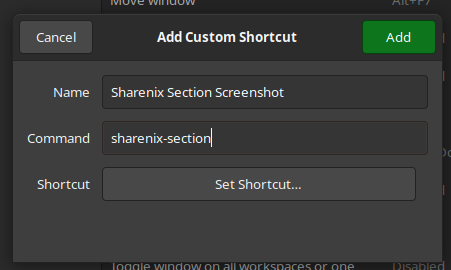
Enter your name in name and sharenix-section in command.

Add Custom Shortcut
To set a shortcut, click “Set Shortcut…” and type your shortcut combination.
When you're done, click “Add”.
You've successfully bound Sharenix to a shortcut combination!